
As SSD technology continues to radically change the storage landscape, hybrid devices of many varieties are popping up left and right.
Today, we are going to look at a device called the RAIDon HyBrid RunneR which is a blend of both HDD, and SSD. Primarily aimed at the user-on-the-go, the RunneR is a very interesting device that allows for data duplication and enhanced use of HDD capacity, not to mention the incredible acceleration of using an SSD with your system.
This approach is definitely a new and refreshing approach, so let’s take a look!
Concept
The idea behind the HyBrid RunneR is really rooted in data security. For many users, keeping their data safe is an important priority. The advent of SSDs allows for an extremely fast storage solution in a compact form that can be easily moved/transported.
This device takes advantage of the performance of the SSD and also creates regular backups of the data contained on the SSD. In addition, the RunneR allows the user to utilize the excess capacity of the HDD to provide extended and cost-efficient mass storage capacity.
The RunneR allows one to keep the SSD data backed up to a HDD both in real time and before and after removal of the SSD.
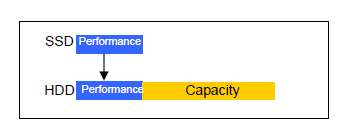
In this diagram, we benefit from the read/write performance of the SSD, meanwhile keeping the advantage of the HDD large storage capacity.

The HDD reserves room from the beginning of the disk for SSD real-time backup or backup scheduling to prevent data loss.
If the SSD fails, used separately from the unit or is lost or stolen, the unit recovers the data to a new SSD when it is inserted into the RunneR.
You are able to take the SSD with you while working in the field as a portable storage device to enhance data mobility. Backup will resume when the SSD is inserted back into the device.
External Characteristics
The device has a nice silver appearance to its exterior. It comes in a standard 5.25 in CD-ROM form factor, so that it will fit into the bays on a typical computer. It is the same size and weighs roughly the same as your garden-variety CD drive. The mounting screws and layout are exactly the same as a CD-ROM drive so as to make installation a breeze!
The two holes on the upper right and lower right on the face of the device are the door release buttons. They are visible on the picture above. Using an enclosed tool (or a pen will work) the user press the holes and the drive bay doors swing open. As we can see, there are two doors, one slim where the SSD is going to be inserted and one wider where the HDD will be inserted.
The user can then simply slide the drives into the enclosure with the sata data and power connections to the rear. Once the drives have slid back as far as they can, you can then close the doors. The doors are connected to the mechanism inside the device that correctly lines up the drives and ensures that they fit tightly. You can also install and remove the drives while the unit is connected to the computer, of course.
From the rear of the unit you are going to see that there is a long slot that has the standard SATA data and power cable connectors, much like any standard CD drive. There is also a small fan included in the rear of the device that keeps the HDD and SSD nice and cool. There is also a jumper to the rear of the device next to the fan connection that will allow you reset the device and it also automatically formats the drives that are contained as well.
NEXT:Installation
Page 1-Introduction
Page 2-Installation
Page 3-Configuration
Page 4-ATTO
Page 5-IOmeter & WIN7 WEI
Page 6-Real World Testing