
Once the device is physically installed into the computer, the next task is to setup the program that allows us to control and configure the RunneR, the HyBrid GUI (Graphical User Interface)
The user can install an operating oystem directly to the drive at this time if it will be used as a boot drive. Power up the device and move a jumper at the rear of the device. This will initialize the drives, and allow them to be available for use. Once the operating system installer notifies us of the devices available, select the device that has the capacity of the SSD, and install. It is just that easy! Once the Operating System is installed, it will allow you to configure the excess capacity of the HDD as a storage drive.
For use as a storage drive, skip the jumper and use the handy option in the GUI that has been provided. Once installed it is very easy to use and keeps things simple.
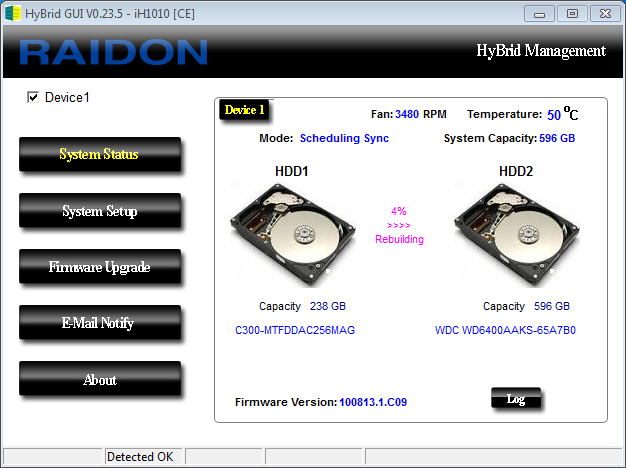
Here we have the home screen of the HyBrid GUI. lets touch on a few things quickly.
The temperature of the device and the RPM of the fan that cools the device are included up top. The “Mode” selection is going to indicate in what capacity the device is operating. Under “scheduling sync”, it indicates that the device is syncing depending upon a preset interval of time (ex. every three hours). In “Real Time Sync” mode the data that is being copied and modified on the SSD is being automatically backed up onto the HDD simultaneously, providing ultimate data redundancy.
The capacity of both devices is listed under the pictures, and the type of device that is being used as well. There is also a field that notifies of the available capacity of the system to the user as a whole.
The field in the middle with the purple lettering is going to keep us updated of whatever action is currently underway. It will give updates on when the drive is backing up, or rebuilding the SSD data. It will also tell if the device is in a normal state or if there is an HDD or SSD only installed currently.
 Under the “System Setup” pane there is the option to configure the frequency of the data backups. The user can set time intervals, or simply uncheck the “Schedule Backup Enable” box. Doing so enters the device into Real Time Sync Mode.
On the upper left is also the initialize button that will initially configure the device with the two drives inserted. This formats them and fuses them together into a backup system.
Under the “E-Mail Notify” pane one can setup up ythedevice to actually email when certain things happen, such as if a HDD fails or someone removes a device from the enclosure. This could be very helpful in a enterprise situation where you have multiple users accessing/using the same drives, or many devices that would be hard to manage.
Once the device is installed, you will configure the two partitions. Here under “Disk 1” in the disk management window you can see that you are presented with two separate partitions. The first is the speed of the SSD, but backed up onto the HDD as well. The second partition is the unused space that will be used as a storage space so that you can benefit from the excess capacity of the HDD. We simply configure the excess capacity into a New Simple Volume if we have already installed the operating system to the device. If the device is being used purely as storage and not a boot volume, then the user needs to create volumes on both partitions to access them.
Once these steps are done, we are ready to go!
NEXT:ATTO
Page 1-Introduction
Page 2-Installation
Page 3-Configuration
Page 4-ATTO
Page 5-IOmeter & WIN7 WEI
Page 6-Real World Testing