TRIM IN RAID AND CRUCIAL REALSSDs
Before we start, we need to give ample warning that TRIM does not work in RAID. The most recent release of Intels RST package is 9.6.0.1014. Crucial C300 SSDs are ideal for RAID, more so than the competition, because they have very aggressive garbage collection, or ITGC, which works in a similar fashion to TRIM and ensures that the SSD remains at top performance levels.
THE BUILD PROCESS
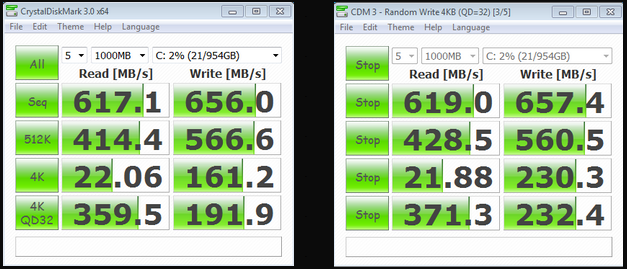
1. Download Intels Latest Rapid Storage Technology Drivers and save the package to external media.. The RST version you use will make a difference to your end performance. For this example, take a look at these tests where we pull out all the stops to keep your interest. On the left is 4x256GB SSDs (yup…thats 4) with RST drivers ver. 9.6 while on the right is the ‘just about to be released ver. 10.1.0.1008. Take a look at the lower two write scores and how they differ:
The most important thing to see here are your small 4k random write speeds which play a large part in the visible performance that you will see. That is 70MB/s difference simply with the RST upgrade.
2. Print Off This Page For Review. One has to realize that, in completing the next point, there is no way to follow along any further. Lets print it off right now or get it onto a separate computer system. A laptop is ideal;
3. Reboot into BIOS, select RAID and Reboot. Once in BIOS, there will be an option that lets you select your configuration mode. On an ASUS Rampage, you select ‘Storage Configuration‘ and it says, ‘Configure SATA as:’ and then gives you three options which are IDE, RAID or AHCI.
 Select RAID and Reboot but be ready for it because the Intel Matrix Storage Manager Screen will appear for a few seconds when it reboots.
4. Press Ctrl+I and then Select Create RAID Volume. You will then arrive at a screen with four simple steps:
- Select RAID Level (RAID0)
- Select Disks (Move Down and Press Space Bar To Select)
- Select Stripe (Intel Recommends 16k for SSDs)
- Select Capacity (At Max By default)
5. Reboot and Set Your Boot To RAID. When you complete your selection in the RAID menu and press the Escape key, the system will reboot. When you reboot, be ready to go back into the BIOS menu to ensure your RAID volume is set as the primary boot device. If you have other drives present, chances are that it won’t be set properly and you need to ensure the primary boot is set to the RAID volume. Save, place your Windows Media into the appropriate peripheral, and be ready to direct your system to the installation media.
6. Reboot and then Direct Your Boot To Your Windows 7 Disk/USB For Installation. Make sure you have available your windows 7 Installation media in the system and direct the system to it. For instance, in this installation the Windows 7 media was in the USB so on the reboot, we continually pressed the F8 key until the ‘Boot Selection’ menu appeared and directed it to the USB for installation.
7. Set your installation partition and install Windows. When you start the Windows7 installation it will come to a menu where you can select the partition (if you have multiple disks in the system). Create a partition for your RAID drive, format and then select it for the Windows installation and voila! The system will reboot a few times but when done and it restarts, you are running your first RAID.
8. Install the latest Intel RST Package. Now is a good time to install the RST package that you downloaded which should have been placed on a separate media for installation.
9. Enable Write Back Cache In RST. At this point, your system is running in RAID and you will be getting great performance from your RAID. Simply, we want to take you from great to amazing performance. If you go into Programs on your menu you will find a new folder called Intel. Go there and then go into the Intel Rapid Storage application. From there:
- Click on ‘Manage;
- Click on Advanced;
- Click to enable Write Back Cache; and
- Click ‘Yes’ To Continue.
Pg1 – Introduction & Test Protocol
Pg2 – TRIM and Building RAID0
Pg3 – Optimization and RealSSDx4
Pg4 – Benchmarking in RealSSDx2
 The SSD Review The Worlds Dedicated SSD Education and Review Resource |
