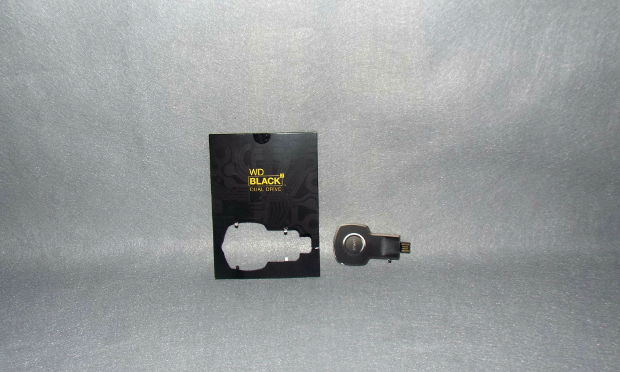
A CARDBOARD USB KEY?
Remember the cardboard USB key that was packaged with the WD Black2? All it contains is an auto-run file: insert it into a USB port and it takes you directly to WD’s product downloads page for the Black2 . The product downloads page also has available two instructional installation videos — one for installing the Black2 with a fresh installation of your operating system, and a second one for installing the Black2 by cloning your existing operating system over to the Black2.
At the right side of the downloads screen are separate downloads for the partition software (the top of the three links), the middle link is WD’s “data transfer software” (which is a version of Acronis’ TrueImage cloning / migration software), and the bottom link is a “F.A.Q. / Tools” file. You are not restricted to using the included cloning software, and we chose to use Paragon’s newest “Migrate OS to SSD” version 4.0, which we recently reviewed here.
Download both the partition software and the data transfer software (or other cloning software) to your original HDD or SSD prior to cloning to the WD Black2. Once the cloning operation is complete and we are able to successfully boot from the newly cloned Black2, we will then open the partition software download and install it. For now, when you receive the option to “Run” or “Save” the download(s) at the bottom of the screen, choose the option to “Save”.
When you begin the process of cloning, only the SSD portion of the WD Black2 is visible to the operating system, and this is where you will be cloning to. The HDD portion will not be visible to the operating system until after we install the partition software.
WD BLACK2 PARTITION MANAGEMENT SOFTWARE INSTALLATION
After completion of the cloning of your operating system to the WD Black2, shut down your laptop / notebook, and remove the existing (source) HDD or SSD, and replace it with the Black2. Once the Black2 is installed, enter your BIOS at boot-up and verify that the Black2 is selected as the first boot option. Once fully booted from the Black2, open the partition software download. At the first window you see, you will select the language that applies.
At the next window, click on “Install.” Note: The “Install” option will toggle to “Uninstall” once you finish installation of the partition software, and this is also where you would go should you need to uninstall it.
What would a software download be without an end-user license agreement? Check the box at the bottom of the window to accept the license agreement, then click “Next.”
You will now see a “Setup summary” window; click “Proceed” to continue.
In short order, you will receive the “Installation complete” window. Click “Finish” to finalize installation, after which a reboot is required.
NOTE: If you are using the WD Black2 in a desktop, or a laptop with more than one drive bay, make sure that you disconnect any other drives prior to booting from the Black2 with the partition software installed, as it may not boot if it detects any other drives.
After the reboot, go to “Disk management” to view the newly created partitions. We now see that “Disk 0” has a total size of 1041.30 GB, separated into three partitions. The first is the standard 100MB “System reserved” partition. The second partition, designated as “C”, is the 111.65GB SSD. The third partition, designated as “D”, is the 931.56GB HDD. Both the SSD and the HDD give up approximately 7% of their total capacity for overprovisioning purposes.
Now that we have the WD Black2 installed, cloned, and configured with the partitioning software, let’s see how it performs!
 The SSD Review The Worlds Dedicated SSD Education and Review Resource |


I’m no much of a laptop person and i think it wont do me any good since i use mine for work(not on desk) and its constantly moving, and hdds parts are kind a risky, so 100% SSDs for laptops or any mobile device. But i wike to see bigger HDD for work at home ! Very helpful review !
the NAND is known to be 20nm but you don’t know the vendor? how is that? technically Sandisk and Tosh do not have 20nm process.
The memory is not marked and the manufacturer didn’t provide the information at the time of the report. We don’t guess.
I bought one of these and have installed it with programs on SSD and data on the 1TB HDD.
I find the 1TB HDD slow to respond to document opening etc. I would have preferred a 7,200 rpm HDD connected to the SSD
Being a pure SSD lover, I can’t say as I blame you.
Love this product… Installed it 6 months ago and it made my 3 year old laptop respond faster than my friends 2015 gaming laptops (with sshd in it). Money well spent.